
I thought it would be fun to go through the process and put it up here for anyone who's interested. There some other Lego Boba Fett costumes out there that I referenced for inspiration, but most of the design is my own.
I took a lot of measurements before I got started and then more along the way. I don't know all the costume terms for these so I made up my own so I would know what they were. Here's what I ended up with. Of course they'll be different for everyone.
shoulder to shoulder-11
collar to waist - 12
waist width - 10
t-shirt collar - 15
profile width - 8
arm hole 13
thigh - 8
ankle to knee - 9
thigh front width- 5
Thigh side width - 6
full leg front minus belt strip(1.5) - 18.5
Full leg side minus belt strip(1.5) - 21
Rear thigh - 9.5
lego foot height 4
lego foot length from ankle - 7.5
head- 20 around, 8 tall
I used cardboard that I had laying around for everything except for the helmet, hands and parts of the legs. I used patterns on plain printer paper for all the pieces, then traced them out on the cardboard because I didn't have another way to keep them square. I used acrylic paint for everything then brushed a layer of Mod Podge to give it a glossy, plastic look.
I started with the body. I used duct tape to put everything together. The back of the neck is just cut and we bend the cardboard to go around his neck.

It has an duct tape hinged panel in the back to put it on with. The tabs are duct tape on both sides with adhesive velcro to keep it closed.

Next I started on the helmet. Craft foam was way too expensive, so I just went to the hardware store and bought a sheet of insulation foam for about $10. It's not as fine as the craft foam, but actually worked better than I thought it would.
I measured my son's head and added an inch to make sure he it wouldn't be too tight. I just took a fabric measuring tape and mad a roughly even oval on the foam, marked out the top, bottom, left and right, then hand drew the curves like connecting the dots. I added about 1.5 to 2 inches to this and made another rough oval around that. I used a hacksaw blade to cut out the foam. I ended up with 8 layers, which way too tall so I took it down to 7, the top being an uncut round piece. Before I glued it together, I checked the rings on my son's head to see where his eyes would fall. As luck would have it, they fell perfectly on the fourth layer. I cut the mouth and eye layers before I glued it together. I'm sure there better glues to use out there, but I just ended up using wood glue. I applied the glue and put a stack of yearbooks on top to press it down as it dried overnight.

The one regret I had with this was that there is a thin plastic cover on both sides of the sheet that I should have removed before gluing it together. When I started filing it down, I was left with a bunch of it sticking out, which I had to cut off after. It never fully came off so it makes the layers more visible.
I used files to shave the helmet down. I did in stages make sure it was even. Then I started shaving down and evening out the sides.


As I started painting it, I realized that the eye slot went further back than I originally thought, so I cut that back. It immediately looked more like Boba Fett instead of the Black Knight.

I also carved the outline of the antenna piece into the right side of Boba's helmet.

Here is the fully painted helmet with antenna add on.


The body was painted in basically two stages. The first was all the green. The green I chose is actually a little darker than the green of the figure, but I like it better. I treated it the same way they do the painting on the figures, with different layers of stamps. I hand painted this, though. I just bought a pack of cheap brushes from the mega-mart.

Second was the outline and red color. This was based on picture I found of a figure that was slightly misprinted, so the red was off. I didn't realize this until later, but I kinda liked it so I left it. I also added the brown belt with more pieces of cardboard. I drew a few guidelines to make sure it was centered then eyeballed the rest.

The hands are actually one of my favorite parts of this project. I bought some cheap kids gloves and cut off the fingers. Then, I cut a Pringles can in half, cut a section out of each half to fit them a little better. I stapled the gloves inside the halves of the can so they would stay on his hands easily.

The actual hands are just circles with a section cut out, so I made a pattern using round containers to make the circles, then cut out pieces of cardboard and foam. I used three pieces of foam for each hand and sandwiched them between two pieces of cardboard to give the tape something on which to hold. I taped them together with a few pieces of tape, then cut the whole for the can. I used the can itself to trace the pattern for the hole. I was going to insert the can and tape around from the inside, but the oils in the can wouldn't allow the tape to stick. When I cut the holes I made them small enough for a snug fit. A few pieces of tape secured them pretty well.


The hands on the real figure are a little darker than the rest, so I just used silver duct tape to cover the hands. Paint would have just worn off, and the tape made them pretty sturdy.
I painted the cuffs like the rest of the costume.

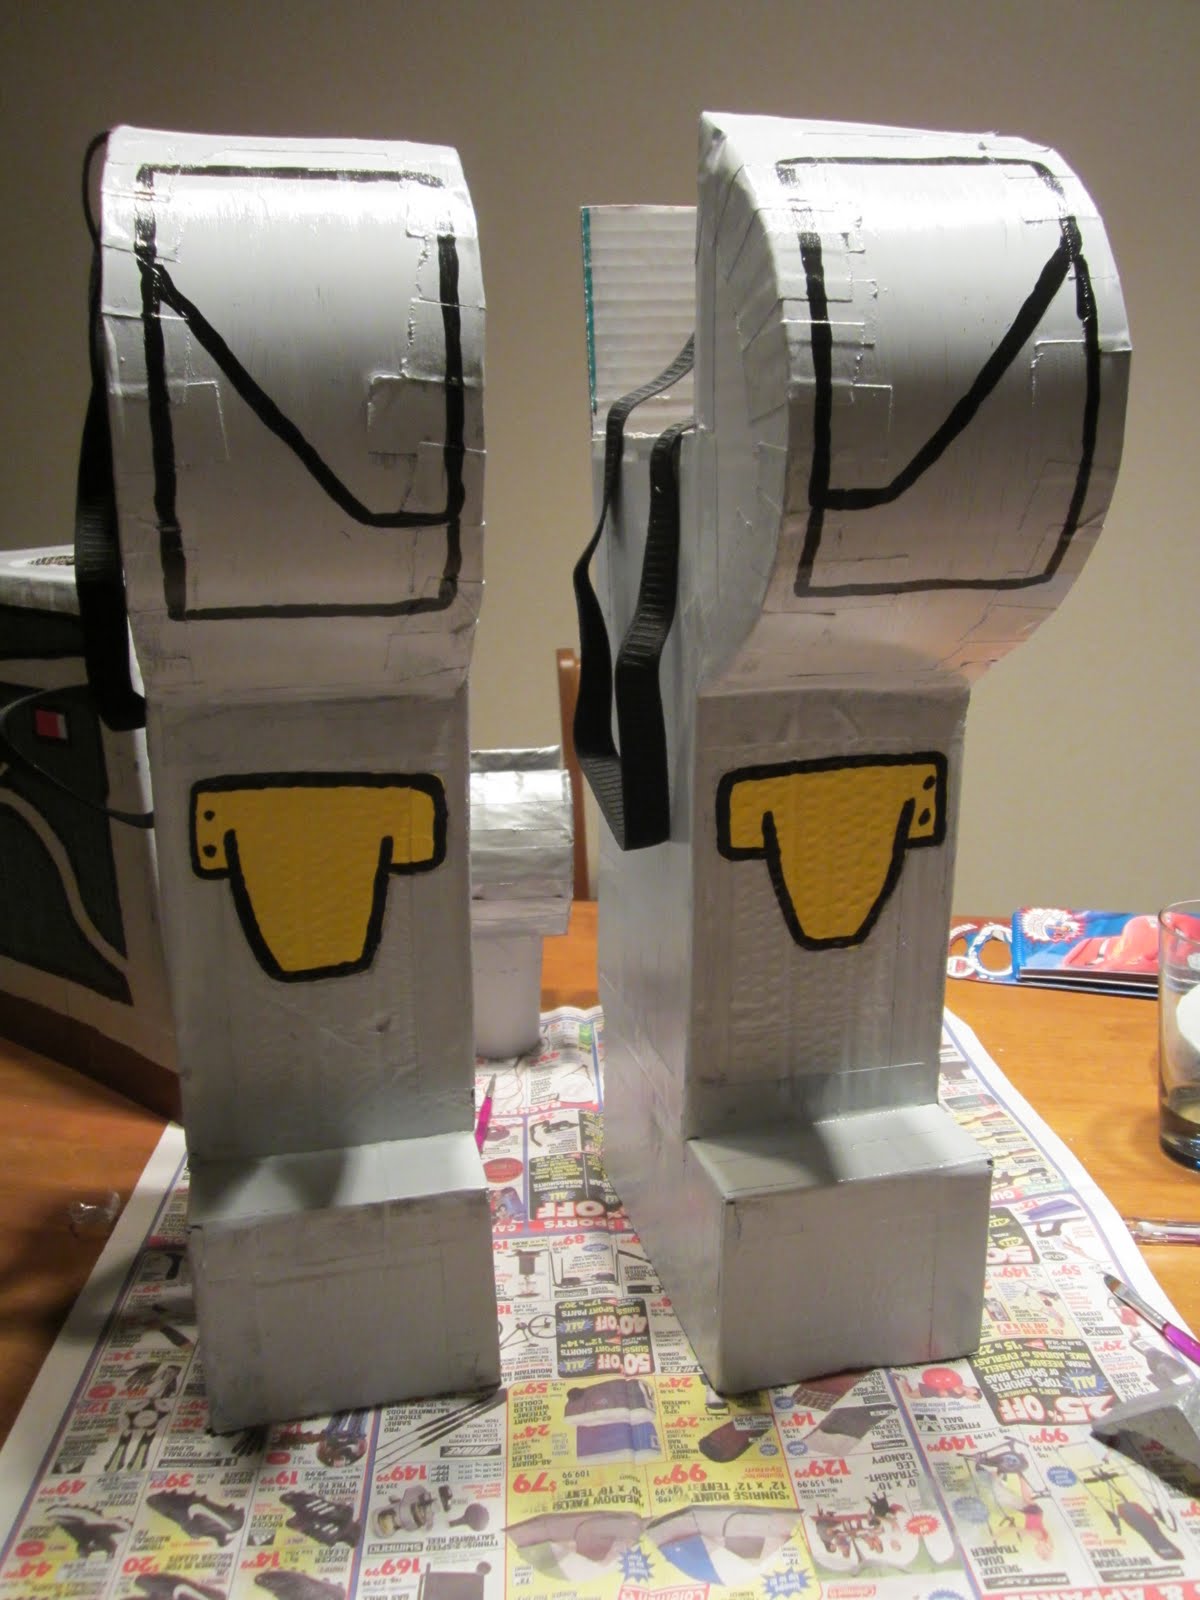
The legs were relatively simple. I used cardboard, of course, and, using the measurements I took, cut them to fit my son's legs.

I left the lower half open so he could move more easily (it was still kind of stiff).

For the rounded "hip" parts, I took a plastic bucket and off the top and bottom, then cut it in half. I attached it with, you guessed it, duct tape and then filled it in with more cardboard, then painted the whole thing. To keep them on, I took some elastic and stapled it to each leg like suspenders which I criss-crossed over his head.

I found a mini figure with some more detail on the legs and added the pockets and yellow knee pads.
And that's pretty much it! This was a really fun project that I got really passionate about. It's funny because, ultimately, my son only wore the whole costume for about 5 minutes. He's almost six and got annoyed with the helmet and legs pretty quick. It's all right, though, I have the pictures to prove he wore it!
I'd do a few things differently if I did it again.
One, I'd probably go with foam board instead of cardboard. It would have cut a lot easier and painted better. The cardboard puckered up a bit when painted.
Two, I would have sprung for an Exacto knife set. I cut the whole thing with a utility knife. It got the job done, but was a little clunky to use.
Lastly, I should have started a week earlier. I would have liked to cover the helmet with putty or something that would fill in the layers and that I could sand down to make it smoother. Or even make the helmet out of paper mache. I would have also liked to have had it done earlier so I could check mobility and make adjustments.
All that said, I think it turned out pretty good! It will be a great memory for me and my son. He loved it and I love making his wishes come true!


